Too Many Tees? 3D Print a BSP Manifold to Split One Water Line Into Many
Walk into the bilge or the locker behind the pressure pump on almost any cruising boat and you will find the same thing: a spaghetti of tee pieces, each one feeding the next, held together with a mix of hose clamps, thread tape and hope. The freshwater pump feeds a tee, which feeds another tee for the galley, which feeds a third for the heads, and somewhere in that chain there is a fitting that drips. Every tee is two more hose joints, two more clamps, and one more place to leak or to trap air. The tidy solution is a manifold: one inlet, several outlets in a row, each with its own valve or hose tail. Chandleries sell brass ones, but only in a handful of sizes and port counts, and the price climbs quickly once you need four or five outlets.
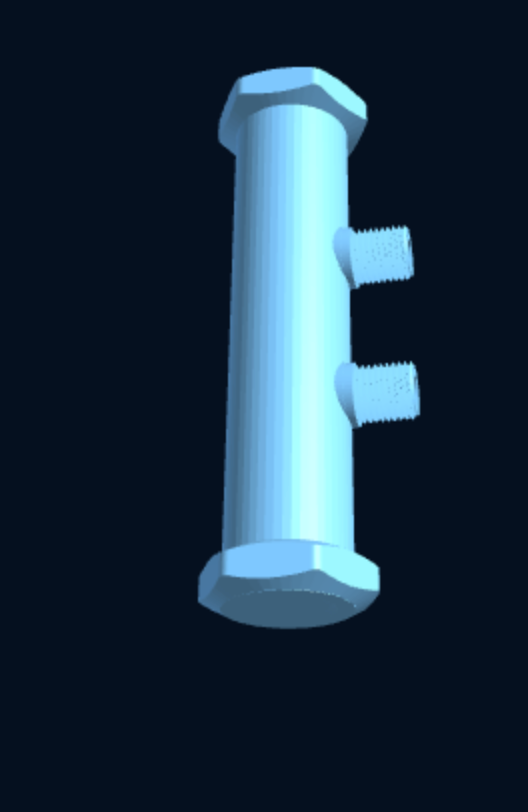
This is exactly the kind of part where a parametric 3D file earns its keep. The MarineLab3D BSP manifold body generates a round body with two threaded female BSP ends and between one and eight side outlets, sized to your system, and you print it in an evening. This guide covers where a manifold makes sense on board, how to configure the file, what material to print it in, and how to install it so it stays dry.

Where a manifold beats a chain of tees
A manifold is simply a distribution block: pressurised water (or air, or drain flow) enters at one end and leaves through several ports. Compared with daisy-chained tees it has fewer joints and clamps, puts every branch in one accessible spot so you can isolate one line without tracing hose through a locker, and feeds every outlet from the same bore instead of the tail end of a series.
Typical jobs on a sailing or motor boat:
- Pressurised freshwater distribution. Pump out to galley, heads, shower and deck wash from one block. Fit an isolation valve on each outlet and you can repair a leaking tap without draining the whole system.
- Tank selection. Two or three water tanks feeding a single pump, each with its own valve so you can draw from one tank at a time and keep track of what is left.
- Drain collection. Sink, shower tray and icebox drains gathered into one line to a sump or a single skin fitting, so you have one through-hull instead of three.
What a printed manifold is not for: fuel, LPG or any line where a failure would be a fire or a flooding risk. More on that at the end.
What the parametric manifold body gives you
The manifold body is a round bar with a through bore that connects everything. The two ends carry a female BSP thread (ISO 228, inch sizes) and a tightening hex, so you can screw in a hose barb or a plug and hold the body with a spanner while you do it. Along the side you get from one to eight outlets, each of which can be male or female BSP in the inch size you choose. The body diameter and length are calculated from the number and size of outlets, and the outlets are spaced far enough apart that a hose barb or a ball valve fits on each one with room to swing a wrench. The thread is the MarineLab3D profile, a helical thread with truncated crests that prints cleanly on an FDM machine.
That gives you a few sensible layouts:
| Layout | Ends | Outlets | Typical use |
|---|---|---|---|
| Inline distributor | Inlet one end, plug the other | 3–5 female, valves screwed in | Freshwater to galley, heads, shower |
| Collector | Outlet one end, plug the other | 2–4 male, drain hoses | Sink and shower drains to one sump line |
| Tank selector | Outlet to pump one end, plug the other | 2–3 female, ball valves | Drawing from one of several tanks |
Male outlets are the compact choice when you want to push a hose straight onto a barb fitting or, on small sizes, seat a hose directly. Female outlets are the flexible choice: you can screw in a ball valve, a BSP hose barb, an elbow barb to turn the hose through a tight locker, or a blanking plug for a spare port you will use later. Add a spare port: it costs nothing and you will use it next season.

Measurements to take before you configure it
You need three things, and none of them require a caliper if you already know your system:
- The main line size. Boat pressure systems are usually 1/2" BSP on the pump outlet with 12 or 13 mm ID hose; many smaller systems run 3/8". Read the thread size off the pump fitting or measure the existing tee: a 1/2" BSP male thread is about 20.9 mm across the crests, a 3/8" about 16.6 mm and a 3/4" about 26.4 mm. The guide on measuring hoses and threads covers this in detail.
- How many branches, now and later. Count the outlets you need and add one. Eight is the maximum; on a typical sailing boat three to five covers everything.
- What goes on each outlet. Decide whether each branch gets a valve (female port, valve screwed in) or a plain hose (male port, or female port plus a barb). Mixed layouts are fine, and the file lets you set every outlet independently.
Set the end size, the number of outlets and the size and type of each one in "Customize dimensions", check the 3D preview, and the STL comes to you after purchase. Check that the outlet size matches the valves and barbs you actually have.
Material and print settings
The body is a pressure part, so treat it as one. For freshwater and drains, PETG is the right choice: it seals between layers better than ASA and shrugs off salt water. ASA is fine for a drain collector or a vent manifold where there is no pressure and the part sits in sunlight. For anything approaching fuel resistance or higher pressure, the recommended option is PA612-CF, but read the safety note before going there.
The settings that matter, in order of importance:
- Axis vertical. Print the body standing on one end so the threads on the ends and the through bore are built as concentric rings. This is what makes the threads clean and the wall continuous around the bore.
- Solid walls. Set enough perimeters to fill the wall completely, three to four at minimum and more on larger bodies, and do not rely on infill to hold pressure. A wall that is perimeters all the way through has no internal voids for water to find.
- Seam and flow. Z-seam set to scarf joint (or at least aligned, not random), flow raised 2–3 %, and part cooling fan low so layers fuse rather than merely stack.
- Layer height. 0.15–0.2 mm.
- Supports. The side outlets are horizontal cylinders and need support under their lower half.
After printing, chase the threads with a tap or a steel fitting. Then, before it goes anywhere near the boat's plumbing, plug all ports but one, connect it to the pump and test at roughly twice the working pressure for half an hour. The watertight fittings guide explains the test. Most boat pressure systems top out around 3 bar, and a well-printed PETG body with a generous wrap of PTFE on every thread holds that comfortably. If you are above about 4 bar, brush a thin coat of epoxy inside the bore as belt and braces.

Installation
Mount the manifold where you can reach every valve without emptying a locker. A short length of aluminium angle or a piece of plywood screwed to a bulkhead, with the body held by two P-clips or a printed two-piece pipe clamp, is all it needs. Support the hoses near the manifold so their weight is not hanging on a threaded outlet.
Assembly order that avoids cross-threading and leaks:
- Wrap every male thread with PTFE tape, six to eight turns in the direction of tightening, or use a paste thread sealant rated for potable water on the freshwater system.
- Screw valves and barbs into the outlets first, holding the body by its end hexes. Hand tight plus a quarter to half a turn; printed threads do not need brass-level torque and over-tightening splits them.
- Fit the inlet barb at one end and the plug at the other, or a second barb if the line continues through.
- Push hoses on and clamp with 316 stainless hose clips, two on the inlet.
- Pressurise slowly with all valves closed, then open them one at a time and check each joint with a dry paper towel.
Label the valves: "galley", "heads", "shower" on each handle saves confusion when someone else has to shut something off in a hurry.
Related parts from the same collection
Everything that screws into the manifold is in the Plumbing & Pumps collection, and the sizes match, so you can build the whole distribution block from one set of files:
- BSP hose barb fitting: male BSP from 1/8" to 1" with a three-barb tail for 6 to 25 mm hose, the standard way to get from a female outlet to a hose.
- Elbow BSP male × hose barb: 45° to 160° bend so a hose can leave the manifold sideways in a tight locker without kinking.
- BSP blanking plug / cap: free, in sizes 1/8" to 1 1/2", with an optional O-ring seat. Print one for every spare port.
The weekend plumbing set article shows how to print a whole kit in one go, and the BSP versus NPT guide matters if your boat has tapered US-market fittings.
A note on safety
A 3D-printed manifold is not certified marine equipment. It is a sound solution for freshwater, deck wash, drains and vents when printed in the right material with solid walls and tested before use. It is not the right part for fuel, LPG, hydraulic steering, engine cooling or anything below the waterline without a seacock upstream. Verify material suitability for your application, pressure-test at twice the working pressure and inspect the part every season.
Questions about sizing the manifold for your system, or a layout not covered here? Write to info@marinelab3d.com and we will help you configure it.