Old Screw Holes in the Cabin? 3D Print Snap-In Cover Caps Sized to the Hole
Every boat older than a season has them: a row of empty screw holes where a previous owner's chart light used to be, a drilled-out hole in the headliner from a speaker that never got fitted, exposed screw heads on a locker front that snag towels and sleeves. None of it is structural. All of it looks tired, collects dirt and, on a liner or bulkhead, leaves an open path for damp to reach the plywood behind. This guide shows how to close those holes cleanly with a snap-in cap you print yourself, sized to the exact hole, and where a cap is not the right answer.
Why a snap-in cap beats filler for most cabin holes
The usual fixes are wood filler, a blob of sealant, or a chrome screw cap from the chandlery. Each has a problem on a boat. Filler shrinks, cracks with the panel flexing and never matches a vinyl liner or textured GRP. Sealant looks like sealant. Off-the-shelf caps come in three or four sizes that rarely match the hole you actually have, and the metal ones eventually stain the surrounding surface with rust bloom.
A push-in cap printed to size solves the fit issue outright: you measure the hole, type the number in, and the fins are cut to grip that diameter. Because it is a friction fit, it is reversible. If you ever want to reinstall hardware in that spot, you pull the cap and the hole is exactly as you left it. And because it is plastic, it will not corrode or leave rings on gelcoat.

How the cap works
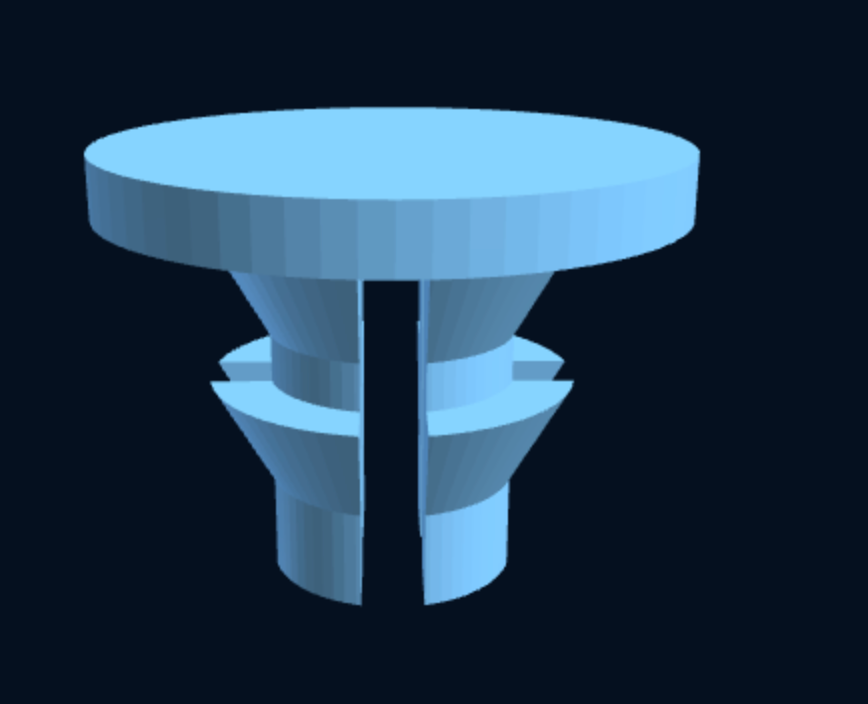
The Push-in Screw / Hole Cover Cap is a free parametric file in our Interior & Cabin collection. It is a simple part, and that is the point. A christmas-tree stem with a cross-slit splits into four flexible fins. Push it into the hole and the fins compress, then spring back against the wall of the hole and hold. No glue, no thread, no tools.
Configurable parameters in the "Customize dimensions" tool on the product page:
- Hole diameter: from 4 mm up to 30 mm, which covers everything from a bare wood screw hole to a small cable pass-through or an abandoned gauge cut-out.
- Head diameter: always at least 2 mm larger than the hole, so the rim overlaps and covers any chipping or ragged edge left by the drill.
- Head style: flat, for panels where you want the cap to disappear, or domed, which reads as a deliberate finishing detail on a locker front or trim strip.
- Stem length: match it to the panel thickness so the fins land inside the material rather than in fresh air behind a thin liner.
You preview the result in 3D, then download the STL. Print a set in the colour of your liner and they blend in; print them in a contrast colour and they look intentional.
Measuring the hole properly
Getting the diameter right is what makes the difference between a cap that stays put and one that falls out in the first chop. Use digital calipers on the hole itself, not on the screw that came out of it. A #8 wood screw leaves a hole that is nothing like 4.2 mm once the wood has been chewed a bit; it may well be 5 mm and slightly oval.
| Situation | How to measure | What to enter |
|---|---|---|
| Clean drilled hole in GRP or plywood | Calipers, inside jaws, two axes | Average of the two readings |
| Chewed screw hole in soft ply | Calipers across the widest point | Widest reading, then head Ø +4 mm to be safe |
| Hole in vinyl-covered foam liner | Measure the backing board, not the vinyl | Backing hole size; add stem length for the foam |
| Oval or torn hole | Measure the long axis | Long axis; the fins will hold on the short axis |
Also measure panel thickness. If the hole goes through a 4 mm liner with nothing behind it, set the stem so the fins sit in that 4 mm; a long stem with fins waving in space behind the panel will not grip. On thick plywood the opposite applies: a longer stem gives more fin contact and a firmer hold. If your printer's dimensional accuracy is an unknown, the tolerance calibration guide walks through a quick test print that tells you how much your holes and pegs come out over or under size.

Material and print settings
These caps are small and print in minutes, so run a batch of several sizes while you are at it. The stem needs a little flex to snap in without breaking, which drives the material choice.
- PETG is the best all-rounder. It has just enough give that the fins compress and recover, and it does not go brittle in a cabin that swings from 5 °C to 40 °C over a season.
- ASA for anything outdoors or under a hatch where sun reaches it. Slightly stiffer than PETG, so the fit will feel tighter; if a fin snaps on insertion, go 0.2 mm larger on the hole parameter.
- PLA works for a dry saloon and is fine for a quick fix, but it is the stiffest of the three and creeps in heat, so avoid it near an engine room bulkhead or a deck head that gets direct sun.
Print head-up, flat side on the bed, with no supports. Two or three perimeters and any infill; the part is essentially all wall anyway. Layer height 0.2 mm is fine. Because the stem is a small footprint on the bed, print a few at once so each layer has time to cool before the next one lands, otherwise the fins can come out soft and rounded. A 0.4 mm nozzle handles the 4 mm size without trouble.
Installation
Clean the hole of old sealant or wood fibres. Push the cap in by thumb; if it needs a mallet, the hole parameter is too small. If it drops in with no resistance, it is too large, though on a soft liner you can rescue a loose cap with a drop of contact adhesive on the fins. For a permanent close on a hole that led outside (an old cable entry through a cockpit locker, say), seal the hole from behind first with a smear of polyurethane sealant, then cap the front for looks. The cap is cosmetic; the sealant is what keeps the water out.
On liners with a foam layer, push slowly and straight. The fins will follow the hole in the backing board; if you angle the cap the head will sit proud on one side.
Where a cap is the wrong answer
A push-in cap closes a hole; it does not restore strength or watertightness. Do not use one on deck to plug a hole that was through-bolted hardware. That hole goes through the deck laminate and probably the core, and the correct repair is to ream out any wet core, fill with thickened epoxy and fair, then gelcoat or paint. Likewise for hull-side holes below or near the waterline, which need a proper laminate repair, and for holes in a fuel or water tank, which need a threaded fitting such as a BSP blanking plug, not a friction cap. There is a longer list of things to keep 3D printing away from in what not to 3D print on your boat.
Related designs for the same job
Often the reason a hole exists is that something was removed, and the reason you are filling it is that you want to mount something else nearby. Two files from the same collection pair well with the cover caps. The Custom Wall Clip Holder is a sized-to-fit clip for torches, handheld VHFs, winch handles or anything cylindrical you want off the chart table and on a bulkhead, so you can move the mount to a better spot and cap the old holes. The Vent Grille does for larger openings what the cap does for small ones: a sized cover for a cut-out that used to hold a fan, a blower or an old speaker, while still letting air through. For the general question of putting things on walls without adding new holes, see drill-free mounting for 3D-printed parts.

Safety note
3D-printed parts from MarineLab3D are digital files, not certified marine equipment. The cover caps described here are cosmetic closures for interior and non-structural surfaces. They do not restore structural strength, they are not a watertight seal on their own, and they must not be used to plug holes in the hull, below the waterline, in the deck laminate where hardware carried load, or in fuel and water systems. Check the material and fit for your application and inspect prints before installing them.
Questions about a hole that does not fit the parameters, or a liner that needs a different stem profile? Write to info@marinelab3d.com with a photo and the measurements and we will tell you whether the cap will do it or whether you need a different part. Download the free file from the Push-in Screw / Hole Cover Caps page, or browse everything in For Free.